# Receive an incoming SMS Message
Note:
Before you can get started, you need the following already set up:
-
- [The latest version of .NET with **Long Term Support**](https://dotnet.microsoft.com/download) and a familiarity with how to create a new MVC app.
- [ngrok](https://ngrok.com/). You'll use ngrok to open a tunnel to your local server.
Learn how to handle incoming SMS messages in a .NET MVC application with the Sinch .NET SDK.
Steps:
1. [Set up](#set-up-your-net-application) your .NET application
2. [Start](#start-your-web-server-and-set-up-a-tunnel) your web server and set up a tunnel
3. [Send](#send-your-sms-message) your sms message
## Set up your .NET application
1. Create a new folder where you want your app project. Then, open a terminal or command prompt to that location.
2. Create a new .NET MVC app with the following command:
```shell
dotnet new mvc
```
The easiest way to install the SDK is using the [`dotnet` CLI](https://learn.microsoft.com/en-us/dotnet/core/install/windows?tabs=net70):
1. Open a command prompt or terminal to the local repository folder.
2. Execute the following command:
```shell
dotnet add package Sinch
```
### Add the Controller to your application
The controller does the work of handling the SMS. It receives the incoming SMS from Sinch's servers and performs an action in response. In this tutorial, it simply replies to your incoming message, but you can add any business logic you want.
1. In the `Controllers` folder of your project, create a new file named `InboundController.cs`.
2. Populate that file with the "InboundController.cs" code below:
### Modify your application
The code provided includes placeholder parameters. You'll need to update the parameters detailed in the following subsections with your values.
#### Initialize the client
Before initializing a client using this SDK, you'll need three pieces of information:
- Your Project ID
- An access key ID
- An access key Secret
These values can be found on the [Access Keys](https://dashboard.sinch.com/settings/access-keys) page of the Sinch Build Dashboard. You can also [create new access key IDs and Secrets](https://community.sinch.com/t5/Conversation-API/How-to-get-your-access-key-for-Conversation-API/ta-p/8120), if required.
Note
If you have trouble accessing the above link, ensure that you have gained access to the [Conversation API](https://dashboard.sinch.com/convapi/overview) by accepting the corresponding terms and conditions.
To start using the SDK, you need to initialize the main client class with your credentials from your Sinch [dashboard](https://dashboard.sinch.com).
Note:
For testing purposes on your local environment it's fine to use hardcoded values, but before deploying to production we strongly recommend using environment variables to store the credentials.
```cpp Initialize client
using Sinch;
var sinch = new SinchClient("YOUR_project_id",
"YOUR_access_key",
"YOUR_access_secret");
```
You can also implement the client using ASP.NET dependency injection. `SinchClient` is thread safe, so it's fine to add it as a singleton:
```cpp Initialize client using dependency injection
builder.Services.AddSingleton(x => new SinchClient(
builder.Configuration["YOUR_project_id"],
builder.Configuration["YOUR_access_key"],
builder.Configuration["YOUR_access_secret"]));
```
br
Note:
If the `SmsRegion` option is not supplied, SinchClient defaults to US region.
br
Ensure that you save the file.
### Build your project
Before executing your code, you must first compile your application. Execute the following command:
```shell
dotnet build
```
## Start your web server and set up a tunnel
1. Start the server by executing the following command:
```shell
dotnet run
```
Take note of the port on which the server is running.
2. Open a tunnel to the server you just set up. We are using [ngrok](https://ngrok.com/) for this. If you don't have ngrok installed already, install it with the following command:
```shell
npm install ngrok -g
```
3. Open a terminal or command prompt and enter:
```shell
ngrok http https://localhost:
```
You will see a screen like the following.
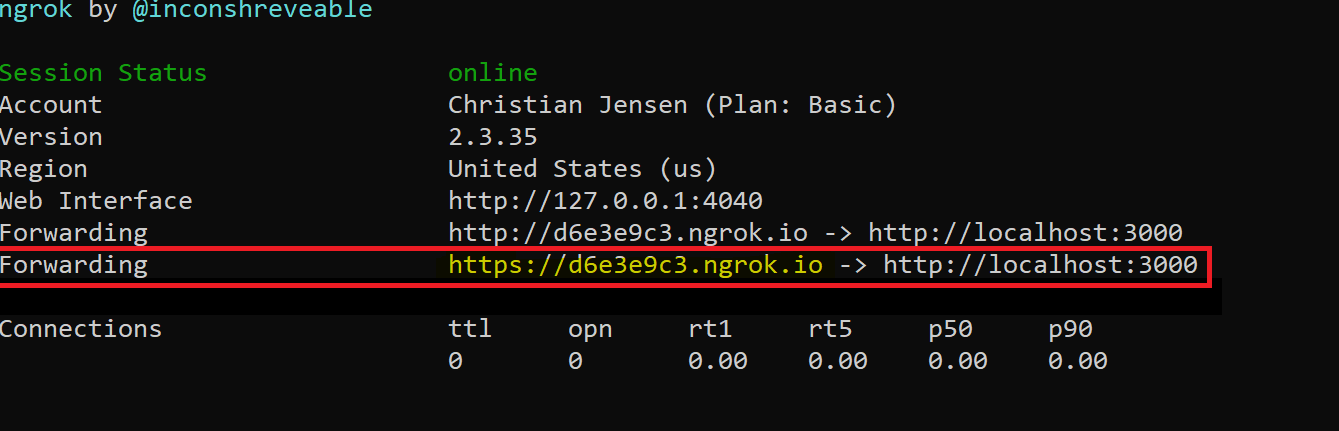
4. On the highlighed "Forwarding" line, copy the address ending in `.ngrok.io` and add `/Inbound/ReplyToInbound` to the end of it.
### Configure your Callback URL
1. To configure a callback URL for your Sinch account, login to your [dashboard](https://dashboard.sinch.com/sms/api/rest).
2. Click on the service plan ID link and edit the Callback URL field with the ngrok.io domain URL from the previous section.
## Send your SMS message
Now send an SMS message to your Sinch number from your mobile phone and you will get an automatic reply.
## Next steps
The code you used in the `Inbound.cs` file sends a POST request to the Sinch API `/batches` endpoint to send the SMS message.
- Explore the [API specification](/docs/sms/api-reference/) to test more endpoints.
## Additional resources
- Click [here to read more about the batches endpoint](/docs/sms/api-reference/sms/batches).