Before you can get started, you need the following already set up:
Set all SMS API configuration settings.
- Node.js and a familiarity with how to create a new app.
- ngrok. You'll use ngrok to open a tunnel to your local server.
Quickly set up a node.js server to receive SMS messages with the Sinch SMS API.
First we'll create a Node project using npm. This creates a package.json and the core dependencies necessary to start coding.
To create the project:
Create a folder called
receive-sms-appNavigate into the folder you created and run the following command.
npm initThis command adds the package.json file. You will be prompted to provide values for the fields. For this tutorial, you can simply accept the default values and press enter at each stage.
Add the axios package with npm to generate the necessary dependencies. In this application, we are going to use Express to handle incoming requests.
npm install axios
npm install express
Create a new file named index.js in the project and paste the "Receive an SMS message" code into the file.
// Find your Service Plan ID and API Token at dashboard.sinch.com/sms/api/rest
// Find your Sinch numbers at dashboard.sinch.com/numbers/your-numbers/numbers
const SERVICE_PLAN_ID = 'YOUR_servicePlanId';
const API_TOKEN = 'YOUR_API_token';
const REGION ='YOUR_region'
const SINCH_URL= 'https://'+REGION+'.sms.api.sinch.com/xms/v1/' + SERVICE_PLAN_ID + '/batches'
const headers={'Content-Type': 'application/json', 'Authorization': 'Bearer ' + API_TOKEN}
const axios = require('axios')
const express = require('express');
const app = express();
const port = 3000;
app.use(express.json());

app.post('/', async (req, res) => {
  var requestBody = req.body;
  console.log(requestBody);
  const payload = {
    from: requestBody.to,
    to: [requestBody.from],
    body: 'You sent: ' + requestBody.body,
  };

axios.post(SINCH_URL, payload, { headers })
    .then(response =>
        console.log(response.data)
    ).catch(error =>
    console.error('There was an error!', error.response)
);
res.send('Ok');
});

app.listen(port, () => {
  console.log(`Listening at http://localhost:${port}`);
});Change the following parameters in the code to your values.
| Parameter | Your value |
|---|---|
SERVICE_PLAN_ID | The service plan ID found on your Sinch Build Dashboard. SMS > APIs > REST configuration |
API_TOKEN | The API token found on your Sinch Build Dashboard. SMS > APIs > REST configuration > Click Show to reveal your API token. |
Double check that the region is correct on your base URL. Learn more about regional options here.
We use webhooks to notify your application when someone sends a text to your Sinch number. To handle these, you will learn how to create a webserver and make it reachable on the Internet.
Start the server by executing the following command:
node index.jsNow you need to open a tunnel to the server you just set up. We are using ngrok for this. If you don't have ngrok installed already, install it with the following command:
npm install ngrok -gOpen a terminal or command prompt and enter:
ngrok http 3000You will see a screen like the following.
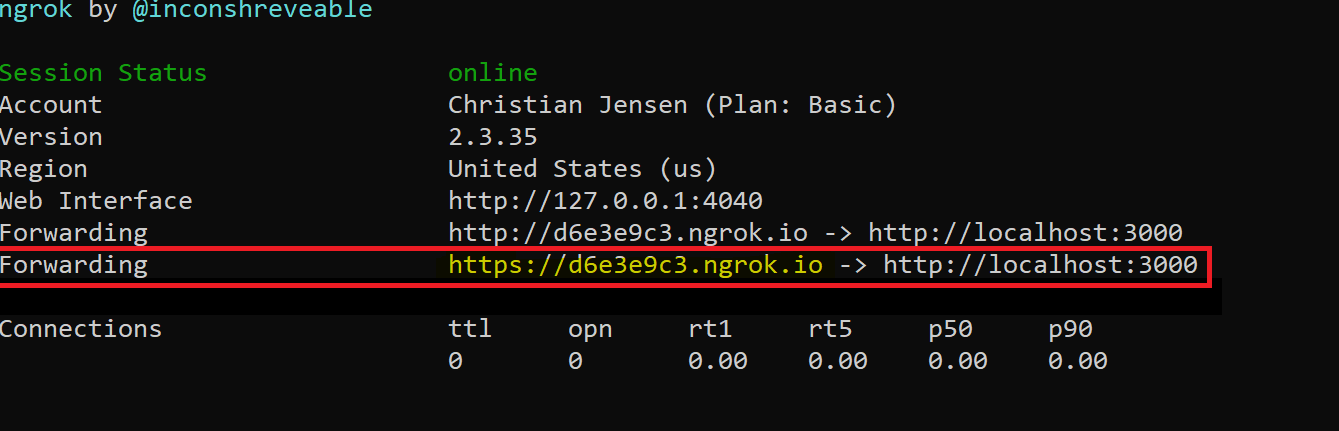
On the highlighed "Forwarding" line, copy the address ending in
.ngrok.io.
Next, configure a Callback URL for your Sinch account.
- On your Sinch Build Dashboard-> Service APIs click on the service plan ID link.
- In “Callback URL” click Add Callback URL and paste in the HTTPS address referred to in the previous section.
To test your application, send an SMS message to your Sinch number from your mobile phone to get an automatic reply.
- Visit our API specification to test more endpoints.