Now that you know how to call yourself using the Voice API, learn how to handle incoming calls.
Before you can get started, you need the following already set up:
- Set all Voice API configuration settings.
- JDK 21 or later. While the Java SDK itself requires JDK 8 or later, this application uses the latest RTS version of Java.
- Apache Maven and a familiarity with how to use the Maven CLI.
To quickly get started setting up a simple client application using the Java SDK:
If you haven't already, clone the sinch-sdk-java repository.
Navigate to the
examples/getting-started/voice/respond-to-incoming-call/src/main/resourcesfolder.Open the
application.yamlfile. Using the Voice app credentials from your Sinch Build Dashboard, add your values:Field Description APPLICATION_API_KEY The unique ID of your application. APPLICATION_API_SECRET The secret for your application. Save the file.
The code containing the business logic for responding to an incoming call is provided here for reference.
// Use this code to handle an incoming call using the Voice API and the Java SDK.
package com.mycompany.app.voice;

import com.sinch.sdk.domains.voice.models.v1.sinchevents.DisconnectedCallEvent;
import com.sinch.sdk.domains.voice.models.v1.sinchevents.IncomingCallEvent;
import com.sinch.sdk.domains.voice.models.v1.svaml.SvamlControl;
import com.sinch.sdk.domains.voice.models.v1.svaml.action.SvamlActionHangup;
import com.sinch.sdk.domains.voice.models.v1.svaml.instruction.SvamlInstructionSay;
import java.util.Collections;
import java.util.logging.Logger;
import org.springframework.stereotype.Component;

@Component("VoiceServerBusinessLogic")
public class ServerBusinessLogic {

  private static final Logger LOGGER = Logger.getLogger(ServerBusinessLogic.class.getName());

  public SvamlControl incoming(IncomingCallEvent event) {

    LOGGER.info("Handle event: " + event);

    String instruction =
        "Thank you for calling your Sinch number. You've just handled an incoming call.";

    return SvamlControl.builder()
        .setAction(SvamlActionHangup.builder().build())
        .setInstructions(
            Collections.singletonList(SvamlInstructionSay.builder().setText(instruction).build()))
        .build();
  }

  public void disconnect(DisconnectedCallEvent event) {

    LOGGER.info("Handle event: " + event);
  }
}Open a terminal or command prompt to the
examples/getting-started/voice/respond-to-incoming-callfolder, and start the server by executing the following command:Start servermvn clean spring-boot:runOpen a tunnel to the server you just set up. We are using ngrok for this.
Note:If you don't have ngrok installed already, install it with the following command:
Install ngroknpm install ngrok -gOpen a second terminal or command prompt and enter:
Start ngrokngrok http 8090Note:By default, the Springboot server is listening on port 8090. If you need to change this, you can modify the port in the
application.yamlfile. If you change the port, make sure you start your ngrok tunnel on that port instead.In your console you will see an ngrok URL. Copy that URL and append
/VoiceEventto the end of it so that it looks something like<ngrok-url>/VoiceEvent.Navigate to your app on your dashboard. Under the Settings section, you'll see a field labeled "Callback URL." Enter your URL into that field and click Save.
Now your server is listening and your callback URL is configured, so you're almost ready to test everything and make a phone call. But before we do, let's take a closer look at callbacks. If you already know about callbacks, skip right to calling your Sinch phone number.
Callbacks (also known as "webhooks") are the method that the Voice API uses to figure out what you want to do with a call. Basically, a callback is a request that the Sinch servers send to your server whenever something happens (otherwise known as an "event") in the call that requires some input from you. There are a few different types of events, but the two we are concerned about for this guide are the Incoming Call Event and the Disconnected Call Event.
An Incoming Call Event happens whenever someone calls one of your Sinch numbers. In essence, someone dials your number and so Sinch servers reach out to you and say "how do you want me to handle this call?"
Most callback events expect a response, depending on the event. The Incoming Call Event expects to receive back a SVAML object in response. You can read more about SVAML here, but just know that SVAML is a markup language Sinch developed to control calls.
The below diagram demonstrates exactly what's happening:
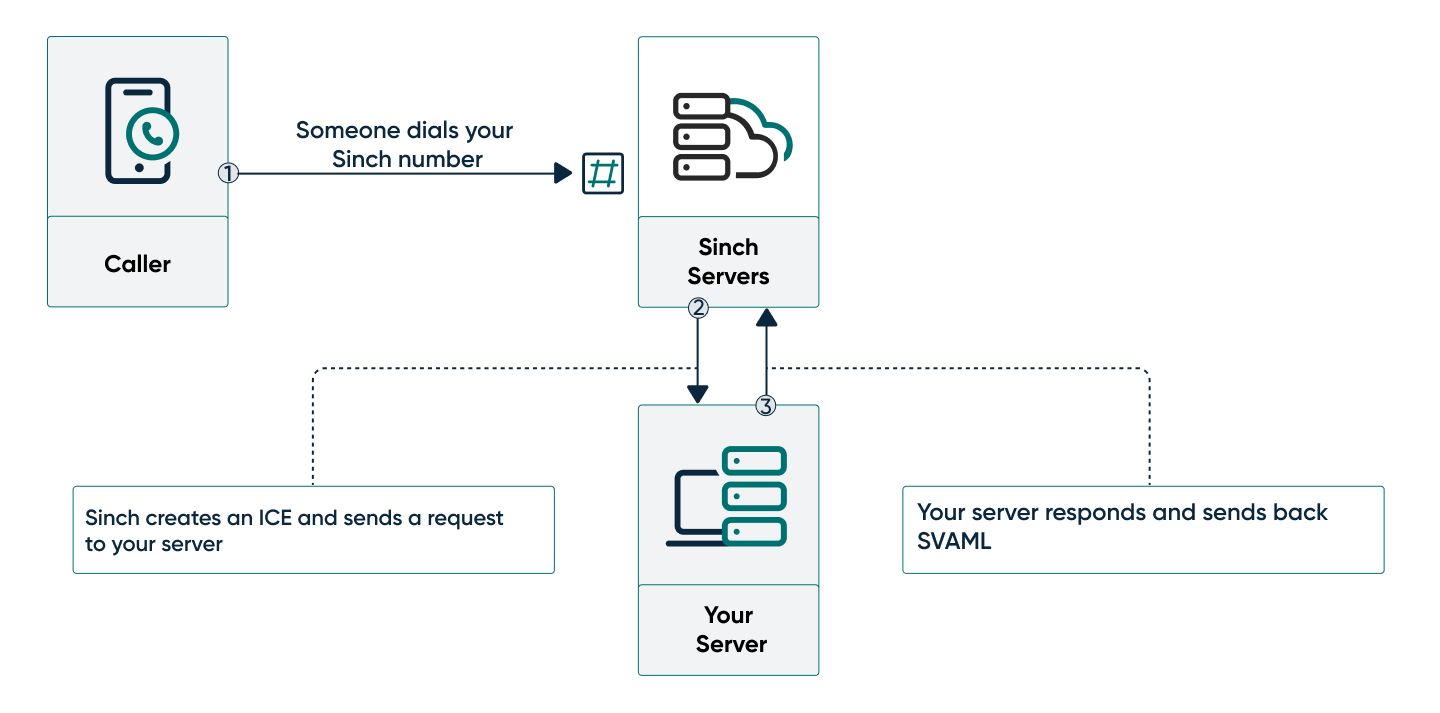
- Someone dials your Sinch number from a handset.
- The Sinch servers create an ICE and send a POST request to your server.
- Your server listens for the request and sends back a SVAML response to tell the Sinch server how to handle the call.
In this sample application, this is the SVAML object that you will use to respond to the callback (we've also provided the underlying JSON SVAML object for comparison):
public SVAMLControl incoming(IncomingCallEvent event) {

  LOGGER.info("Handle event: " + event);

  String instruction =
      "Thank you for calling your Sinch number. You've just handled an incoming call.";

  return SVAMLControl.builder()
      .setAction(ActionHangUp.builder().build())
      .setInstructions(
          Collections.singletonList(InstructionSay.builder().setText(instruction).build()))
      .build();
  }
This SVAML object has two parts: instructions and an action. Instructions are things you want to be done on the call without changing the state of the call. In this case, we want to play a voice that reads out a text message. Actions are things you want to be done to the call to change its state in some way. In this case, we want to hang up and end the call.
When using the Java SDK, you must serialize the SVAMLControl response object before returning it to the Sinch server, as in the following example:
voiceService.sinchEvents().serializeResponse(response);In this application, that is handled in the Controller.java file.
And that's it! Now we can test.
Look up the free Sinch number assigned to your app and call it using your phone. The call should be picked up by the Sinch servers and you should hear the text from the instruction. Now you know how to handle an incoming call.
Learn more about the Voice API: